Quantcast
Showing posts with label DIY Projects. Show all posts

THANK YOU AJC!


I was thrilled to be interviewed by the Atlanta Journal-Constitution for a feature entitled "Style for the Workplace." In the article they included my 5 tips for creating a functional and beautiful home office as well as two images of my space!


And as promised, I've included more images of my office. In all honesty, the place was a complete wreck before I got the call...but the request for photos gave me the kick in the pants to get it all done and FAST!! Take a look:


The side table, lamp base, and floor lamp are refurbished pieces from the Goodwill, while the settee was a Craiglist find. The upholstery fabric didn't mesh with my color scheme so I made a slipcover from a painter's canvas dropcloth.


The owl was a cool two bucks from the Goodwill and I gave him a quick makeover with white spray paint. Now he fits right in with my Jonathan Adler pottery and Ikea bud vase!

I also revived this old vanity stool and now use it for seating at my conference table.


It took me a day of working non stop to get it all done and of course it was the weekend before the Room Service Atlanta install. Thank God I didn't turn into DesignZilla!


Hope you enjoyed this quick tour. Thanks again AJC for showing this Sweet Georgia Brown some love! It was truly an honor.

CREATE BEAUTIFUL CURTAINS FROM BED LINENS


Thank you to everyone who commented on Monday's video on finding creativity from inspiration images. There's nothing better than a lively discussion that provides valuable feedback to fellow readers as well as give me ideas on how to make things better on BluLabel Bungalow. My continued efforts on the blog will be geared towards helping others be less intimidated and more adventurous when tackling their home's decor.

Here's an amazing comment from Pam who has an equally amazing story!!


She fell in love with the drapes and valance this bedroom while planning her baby's nursery:


She purchase a pair of king-sized sheets from the Carlton Varney's collection on HSN...

and made this beautiful no-sew/sewing optional window treatmeant!! Remarkable,isn't it?


She then crafted this changing table cover from a king size pillowcase. Clearly, she allows nothing to go to waste!


And there you have it. Pam gives full direction on creating the drapes and valance here.
Is this something you would try at home?

4 DESIGN TRICKS FOR CREATING ARCHITECTURAL INTEREST


"Architecture is a continuing dialogue between generations which creates an environment across time." - Vincent Scully

Have you ever fell in love with a model home's decor and visited time and time again trying to discover how to recreate the look? You practically stalked the place by taking pictures, inquiring about paint colors used, furniture dealers, rug selections, etc.? C'mon, I know I'm not the only one! You may not realize that even if you have the exact same furnishings and paint colors, your home will not have the same feeling of grandeur without a few architectural details. Sounds expensive right? Wrong. In this post, I will discuss four design tricks for creating architectural interests that prove to be easy on the wallet, but big on style.

Design Trick #1 - Create a Focal Point with Ceiling Medallions


Ceiling medallions are a quick and inexpensive way to create instant drama. A few quick points:
  1. They are available in plaster (which are heavier, pricier, and more fragile) and urethane-based (which are lightweight, pre-primed, and easy to install). Purchase them from your local home improvement store in the lighting section or from online retailers.
  2. They can be painted, glazed, or faux finished. Not feeling crafty? A wide selection of pre-finished medallions are available for purchase here.
  3. The general rule suggests you divide the ceiling's square footage by seven to determine the medallion diameter for your space.
Want one? This Old House provides detailed instructions (and great photos) on how to install a ceiling medallion...see here.

As an alternative, diyideas.com suggests painting the medallions and using them as wall art as shown above. What a great idea!

So, on the ceiling or on the wall? What is your preference?

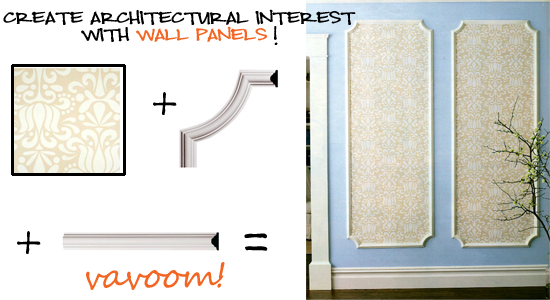
Design Trick #2 - Decorative Wall Panels

 This second trick leaves me a bit nostalgic. Back in the 60's, my oh, so stylish Grandmother installed wall panels with black velvet flocked wallpaper (very similar to this) in the foyer. Fast forward 30 years later, she still received many compliments on its stately and elegant appearance. Framing wallpaper in decorative moldings as seen in the image below is a great design trick that instantly adds panache to a hallway or large wall. Inviting Home gives a wonderful tutorial on completing this look on your own. Click here for project details.


In lieu of wallpaper, leave as is, hang artwork, a medallion, or install a wall sconce within the wall panel for even more chic design options.


Looking for something more contemporary? Visit B & N Industries and have a look at their sleek, modern Iconic Panels Collection. Helinski (shown below) "...is a clean interpretation of the natural bends and patterns of bare birch branches."

These durable panels are formed laminate over a carved wood core can be sawn, nailed, glued, or screwed into the wall.

{images courtesy of Inviting Home,
image commentary by Erika Ward for BluLabel Bungalow}

Looking for a place in your home to try out the DIY wall panel project? Yes, so am I!

Design Trick #3 Crown Molding
Design Trick #4 Wainscot Paneling

The last two design tricks featured in this series are conveniently illustrated in this one photo. I had to look no further than my personal design inspiration file. This dining room is one of my favorites (right now) because of its sophisticated and elegant, yet kid-friendly and unpretentious design. I believe a dining room should reflect how you live and not be treated like a one-room museum...I digress.
Back to today's subject, the two design tricks for creating architectural interest in this room I have to say are the use of crown molding and wainscot paneling (sometimes referred to as judges panels). Craftsman-pioneer Gustav Stickley wrote that molding should
"have each room so interesting in itself that it seems complete before a single piece of furniture is put into it."
After World War II, the American housing boom ushered in mid-century modern which eliminated molding in its minimalist design. Today, due to the popularity of renovating and neighborhood revitalization, moldings have made a comeback. Increasingly, we are seeing rooms that illustrate the perfect marriage of modern and traditional decor (more on this tomorrow). The above photo is the perfect model of this concept.

Final thoughts using moldings to create architectural interest:
  1. The use of moldings enhances a room's proportion and scale.
  2. It reflects the wealth and taste of its owner.
  3. It makes the most sparsely decorated room feel dressed.
  4. Molding options are much more affordable and user friendly for self-improvement projects.
  5. Timeless, it brings higher resale values to the homeowner.

Resources:


{image credit: If you happen to know the source of this image, please let me know so I can give proper credit. Commentary by Erika Ward for BluLabel Bungalow}

For more inspiring spaces, please visit my latest ideabook at Houzz!

HOW TO FRAME A BULLETIN BOARD


Have you ever attempted a DIY project that looked so easy a preschooler could do it? You then got half way through the project and wish you would've just bought the finished product instead? Well I almost had one of those moments when I began this project:


Here's how it all started...
 

I purchased this board from a thrift store for only 7 bucks!   HomeGoods sells the board on the right for $39.99. It's a great price, but not big enough.  So I said to myself, "Self, you can do this. There are tons of instructions on the web, just pick one."  I referred to Camila's post which is excellent especially if you are handy with the power tools. I, on the other hand, am a complete amateur when it comes to this stuff.


I decided to "wing" it.  After spending almost 45 minutes trying to help the associate cut my trim at a 45 degree angle "freehand" I left pretty frustrated with only the trim. Refusing to accept defeat, I consulted a fellow craft queen on the next step. She mentioned something about a mitre box and saw.  The clouds above opened up...an answered prayer!! I headed to the store, this time Lowes (closer to home), for a mitre box and saw and a few other supplies...


I carefully cut each piece using my mitre saw and nailed them to the existing frame with finishing nails. When the frame was in place, the edges looked like this. Not to worry...if this happens to you, then use wood filler to fill the gaps. When it dries sand it smooth.

 
After repairing and sanding, I wiped the frame with a baby wipe and allowed it to dry for about 5 minutes. I painted the frame with two coats of black satin paint allowing about 2 hours between coats. This stuff dried fast!  There was no need to apply primer before painting .  The trim pieces I purchased were already primed!

The next day my new bulletin board was ready to hang.


I'm so glad I stayed the course and did not give up! Plus, I would've hated to disappoint you all!  Only after I finished this project did I find an awesome video for framing a bulletin board on the Canadian House and Home website.  They had the wallpapered magazine files tutorial, too!!  Those guys sure know how to make everything look easy.

Have you been at your wit's end with DIY project? What was/is it? Did you complete it?

ART WALL DISPLAY IN PROGRESS...


In case you couldn't tell from Tuesday's post, I have rearranged my office furniture...again. Click here to see how it used to look.  Now I have a great wall space where I can display pictures, art work and my inspiration board. The wall currently looks like this...


The look I'm going for is more of a library feel, something like this...

 
The two items hanging on the wall so far are my business license (required by Georgia law to display) and a picture drawn and framed by my late Grandmother.  The other print I want to display is this one below I (and 50 other people) received as a gift from Eddie Ross.

I've been scouting shops for a preframed bulletin/message board and found two contenders: a $39.99 board from HomeGoods and a $399 board from Ballard Designs. The former option is too small, the latter is too expensive!  While out today I stopped by a Goodwill and found the perfect board at the perfect price, $7.00!!  It wasn't framed, but that's an easy fix.  I'll be sure to post a DIY/How-To.

Last weekend I stopped into Savvy Snoot and found this picture (below) in the discount room. The frame needed a little glam so I bought this paint pen from Michaels to embellish it a bit.


Here's a closer look...


I'm not crazy about the autumn leaf print, but it'll be fine for now.  I've secured two appointments this weekend, (yes!!) but I still hope to get a few personal projects completed and to share with you by next week...Chat soon!

Feeling a Little Peacocky


This weekend I received an email from Tonia over at Chic Modern Village with a photo of this awesome find.


She purchased this pair for only $12! By the looks of the photo it appears that do not stand alone and would perhaps be wall decor.  This morning I performed a search for "peacock wall sculpture" and found the image in the inset. Hmm....

I searched a bit more and found it in excellent condition and for sale on a vintage dealer's website.  This 1960's Peacock Wall Sculpture is selling for $650.  And look, Tonia's piece originally had a snazzy jewel encrusted headdress! 

Even though someone snatched her peacocks' bling, I wonder if there is still antique value there?  If she could at least get $200 for them that would be enough for me to "shake a tail-feather"...If not, she could give them an extreme makeover with a fresh coat of paint with a high gloss enamel. The paint may be a step down from their previous lifestyle, but hey we're all downsizing a bit, right?  The "rehabbed" peacocks could get a new job as her wall sculptures or even stand proudly in front of a fireplace.  My first inclination would be to paint them white, but without knowing her home's decor the options are endless.  What do you think she should do?

On TV: Lamp Building with Sarah Richardson


Did anyone happen to catch the episode of Sarah's House on Saturday where she designed a guest suite in the basement?  I loved it and I also love the fact that she is now on HGTV US!  It was just this past November that I upgraded my cable just so I could watch her on the Fine Living Network, but I digress...

Here is the guest room she designed:

The green accent color is a refreshing compliment to the graphic black and white color palette.  This room is surely a pleasant surprise. I'm sure any house guest wouldn't mind sleeping in this basement.  In this episode she splurged a bit with the window installation, but it was so well worth it especially in a subgrade space.

Now for the real reason for this post... Did you see this lamp they built from a vase?  Gorgeous!

It kind of reminds me of these Jill Rosenwald pieces:

The lamp was built from a vase purchased from Pier 1 for $19 and the lamp kit was purchased at the Home Depot. Wow, talk about a look for less!  Tommy, her design assistant, took us (the viewers) along to a lighting boutique where the shopkeeper explained in detail how the transformation from vase to lamp would take place.  At that very moment, "build a lamp" became an item on my to do list. Really, how hard could it be?  Anyone up for the challenge?

Ava's Bedroom Update Part 2


This week has been so busy that I've been unable to spend quality time on Ava's Room.  The hem job on her panels is proof...sad, I know.  I used Stitch Witchery Iron-on Hem Tape (which is okay) but I really should've taken the time to precisely measure the length instead of just eyeballing it.  I've been fighting with the notion of pulling the old sewing machine off my closet shelf.  I read Janell's excellent drapery tutorial series AFTER hanging Ava's curtains.  I think I will try to take some time this weekend or beg someone else to tidy up my work. It would probably be a good idea to hem the curtains properly as well as reinforce the grosgrain ribbon trim.  By the way, I'm pretty satisfied with the trim! It was quick and easy, I just glued it to the panels with Fabri-Tac. 

Ava is my sideline cheerleader and loves to watch me work in her room.  In her little voice, she will occasionally say, "ooh nice!" It's the little things that make it so worthwhile...
 
To carry out the polka dot pattern in the room I added a bit of ribbon trim to a lampshade I bought ($3) at a liquidation warehouse. The lamp is one of two I bought from Target when I got my first condo.  The other lamp is in the boy's room awaiting its fate.  The frog teapot was a gift from Ava's Godmother, the floral in the ceramic baby shoe was created by my Aunt.


Other plans include a wall mural inspired by the scrapbooking paper in the image below.  How sweet would it be to also line the drawers of her armoire with this same print?
 
Now that I will have to spend my weekend redoing the curtains due to my impatience, I know for sure I will take my time when creating this mural.  It won't be nearly as busy as this paper's pattern.  I plan to feature a few of my favorite flowers like the one I circled above.  

Hopefully you've learned from my mistake and will take your time when completing your design projects.  I will spend my free time redoing what should've been done right the first time.  Attention to detail is so important especially when working on a space with a small budget.  The idea is to create a look that appears to cost more, when you really paid less. Lesson Learned!

Ava's Bedroom Update


It was a few months back that Project Nursery featured a custom mood board I designed for Ava's big girl room. At that time, she and her twin brother shared this room:


Since then we moved and other priorities took precedence over her room decor until now.  It's now been five months at the new house and I'm finally on track to creating a fresh, playful little space Ava can call her own.  Fortunately she hasn't voiced her design preferences which means I don't have to entertain the idea of a Dora the Explorer wall decal or comforter set.

Initially I planned to purchase all new furniture, but then decided a few secondhand finds would leave more decorating dollars for other projects such as the boys' room.  Last week I found this armoire for only $20 on Craigslist...and here's the transformation:

Armoire Paint : Ballet Slipper Pink, Krylon
Hardware Paint: Metallics Brushed Nickel, Krylon

If the decision was left to my husband, he would've simply added a fresh coat of white paint.  That too would've been gorgeous, but I really wanted a girly statement piece.  Next, I will add a cut glass top to protect all of my hardwork!

I hope that this will both inspire and encourage you to try thrifting  (if you haven't already) and let me know what deals you find.  So what do you think so far? Don't you agree that pink was the way to go?

Junk in the Trunk


I've been combing Craigslist and scouting a few thrifts stores looking for some design potential.  There's lot's of talent out there...and a lot of junk, too. Here are a few items that made the cut and are on to the next round. 

I can go so many directions with this lamp! It's in good condition, but I am contemplating rewiring it just to be safe.


This piece is really too small to serve as a true bulletin board, but the frame would be great on a mirror. Wouldn't you agree?


I found this armoire on Craigslist.  It orginially was listed with a matching nightstand, for a grand total of $50 for both!  The seller sold the nightstand to someone else, but offered the armoire to me for just 20 bucks. I had to pick it up right away since she was moving the next day...not a problem, I sent my husband over a.s.a.p! I'm planning to put this in Ava's Room. 

What treasures have you found on your hunt? Or as Joi would say, "What's good in your 'hood?"

Evolution of My Home Office - Part 3


Here we are at Part 3 of the Evolution of My Home Office!  In part 1, you saw my office in very raw form shortly after we moved and in part 2 you witnessed me going a bit crazy with a can of gold spray paint.  Since then, I've purchased a "meeting table" and chairs, reupholstered seat cushions and a lampshade, hung curtains, refurbished an old bulletin board, and painted my desk a high gloss black!  Here is the final look:


The idea to cover the lampshade came after last month's post about burlap.  It was so simple, easy, and cheap! I'm very happy with the results.  Click here for instructions on how to revamp your old lampshade.

 
 If you have the option, I recommend positioning your desk in front of your window.  Taking in a view from the outdoors is much more enjoyable than looking at a wall. If you are a nosy neighbor like I am, this is the place to be!


If you like these ideas, you may want to read my previous post: 7 Steps to Styling Your Bookcase Like A Pro.

Here are the above-mentioned reupholstered seat cushions.  Originally covered in a cream microfiber, the chair had the shape I desired, but it desperately needed a punch of color.  I purchased a yard of the Saralisa fabric from Ikea for $8.99, cocked and loaded my staple gun, and went to work on every chair in my office that had a cushion.  Click here to see how.


I am finally at point where I feel comfortable with the look and feel of my new office.  There are just couple of items on my list, such as purchasing a new office chair and perhaps creating a gallery wall opposite my desk. In the Spring, I will paint, switch out the curtains, and reupholster the seat cushions. Aside from these things, it's on to Ava's room.  SIDE NOTE:  I can't wait to show you the piece I scored on Craigslist! It's going to be adorable when I'm done!

So what do you think of the new office space?
Blog Widget by LinkWithin